Showing posts with label Features. Show all posts

Tuesday, 27 June 2017

Updated feature: Project Online Rollup of Task and Assignment Timephased Data

Here is a communication update from Microsoft O365 support team, affecting Project Online.

-----------------------------------------

MC106623

Published On : June 21, 2017

Expires On : October 31, 2017

Action required by September 18, 2017

We’re adding the ability for a PWA admin to set how to rollup task and assignment timephased data. We’ll support weekly, monthly, fiscal period, or the previously supported by day grouping for timephased data. You could also choose to have no timephased data. You’ll have the option to choose which one you’d like to use.

How does this affect me?

If you choose to use this new option, you may benefit from simplified report building, reduced storage requirements, and improved report generation performance. However, existing reports that make use of the following entities could be impacted by this change:

- AssignmentBaselineTimephasedDataSet

- AssignmentTimephasedDataSet

- TaskBaselineTimephasedDataSet

- TaskTimephasedDataSet

We'll be gradually rolling this out in September, and the rollout will be completed by the end of October.

What do I need to do to prepare for this change?

Please review any reports that make use of the task and assignment by day information from the Project Online OData service once this feature is available to your organization. If your reports are rolling up timephased task and assignment data by one of the following new units: weekly, monthly, or by fiscal period, we recommend updating your reports to take advantage of the rollups for better performance. If you have an app that queries all the properties without specifying the property names, it may be impacted by this change. We recommend you set the apps query for specific properties. Read More below.

------------------------------

Configure rollup of timephased reporting data in Project Online

Applies To: Project Online

IMPORTANT:  This article describes the Timephased Data configuration settings that will soon be available. The purpose of this article is to help you plan for this upcoming feature, as it could offer you better performance when using reports that make use of the task and assignment by day information from the Project Online OData service.

Project admins can configure Project Online to roll up timephased reporting data to different levels of granularity. They can choose to roll up their data daily, weekly, monthly, or by fiscal period and retrieve the data through the timephased OData endpoints:

  • AssignmentBaselineTimephasedDataSet

  • AssignmentTimephasedDataSet

  • TaskBaselineTimephasedDataSet

  • TaskTimephasedDataSet

Benefits

A key benefit this provides is that it can help to improve report generation performance, especially in organization that have a lot of Project Online reporting data. While retrieving task and assignment timephased reporting data by day was the only option available previously, many organizations do not need this level of granularity. Being able to retrieve their data on a broader scope (such as weekly or month) can greatly improve report generation performance by reducing the amount of records that need to be downloaded. For example, instead of needing to retrieve 300,000 records when set to daily, setting to monthly could reduce this to a much lower number, such as 10,000 records.

Additionally, other benefits can include simplified report building, and reduced storage requirements.

How do I configure this setting?

  1. In Project Online home page, select Server Settings.

  2. On the Server Settings page, in the Enterprise Data section, select Reporting.

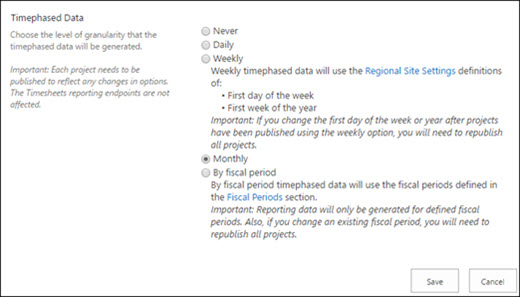
  3. On the Reporting page, in the Timephased Data section, select the option that you need:

    • Never

    • Daily

    • Weekly

    • Monthly

    • By fiscal period

Timephased Data settings

Tip: If you don't use any of the timephased Odata feeds, we highly recommend setting the Timephased Data option to "Never" which provides the added benefit of much faster Reporting Publish queue jobs.

Planning considerations I need to make

  • Republish existing projects - After changing the Timephased data setting, it will only take affect in an existing project if it is republished.

    NOTE: If you have many projects to republish, you can programmatically publish your Project Online projects. You should plan to do this at a time that will be least likely to impact your organization.

  • New instances - In new Project Online instances, note that the Timephased data default setting is Never. Make sure to select the appropriate Timephased data setting after creating your new instance to prevent the need to republish all your projects at a later time. Do also consider the tradeoffs associated with a more granular setting e.g. Daily vs Monthly with regards to the time it takes to Publish as well as pull down the timephased OData feed.

Sunday, 1 January 2012

EPM2010 – Creating Cross-Project Links without saving Master Project

I had a user request about the process for creating links across projects without saving master project. Here are the steps;

  • Firstly, create your projects as normal. In my example figure below, I have two projects ‘001_P1’ and ‘001_P2’.
  • Select the projects in PWA > Project Centre and choose to edit in Project Pro. Alternatively, you can open a blank project and insert the projects.
  • This will open the selected projects in a new blank container project (i.e. master project). Follow best practices e.g. ensuring that the selected projects are in checked-in state prior to opening them in the blank container project.

image.

  • Create cross-project dependencies as you normally would in a standard project. Follow best practice for linking tasks and milestones.

image

  • Once, this is done, close the project and select the ‘Discard Changes’ option. This is so that the blank container (master project) is not saved back to the server. See figure below.

image

  • Next, you will be prompted to save changes to the other embedded/inserted projects. Choose Yes for individual project or Yes to All for multiple projects.

image

  • To check/confirm the changes on individual projects, open the project in Project Pro. Notice the ghost task links (external project task links) in example figure below.

image

Now that the cross-project dependencies have been created, you may wish to publish the individual projects.

Hope this helps.

Sunday, 18 December 2011

EPM/SP2010 – Adding PDF iFilter

Here the steps from Microsoft KB for adding iFilter for SP2010, summarised for clarity.

1. Install PDF iFilter 9.0 (64 bit) from http://www.adobe.com/support/downloads/detail.jsp?ftpID=4025 (http://www.adobe.com/support/downloads/detail.jsp?ftpID=4025)

2. Download PDF icon picture from Adobe web site http://www.adobe.com/misc/linking.html (http://www.adobe.com/misc/linking.html) and copied at C:\Program Files\Common Files\Microsoft Shared\Web Server Extensions\14\TEMPLATE\IMAGES\

3. Add the following entry in docIcon.xml file, which can be found at: C:\Program Files\Common Files\Microsoft Shared\Web Server Extensions\14\TEMPLATE\XML
<Mapping Key="pdf" Value="pdf16.gif" />

4. Add pdf file type on the File Type page under Search Service Application

5. Open regedit

6. Navigate to the following location:
HKEY_LOCAL_MACHINE\SOFTWARE\Microsoft\Office Server\14.0\Search\Setup\ContentIndexCommon\Filters\Extension

7. Right-click > Click New > Key to create a new key for .pdf

8. Add the following GUID in the default value
{E8978DA6-047F-4E3D-9C78-CDBE46041603}

  • Restart the SharePoint Server Search 14
  • Reboot the SharePoint servers in Farm
  • Create a Test site (with any out-of-box site template) and create a document library upload any sample PDF document(s).
  • Perform FULL Crawl to get search result.

Wednesday, 19 October 2011

The Project Map: Your road map to project management

Here is a great article from Microsoft online help….

Applies to: Microsoft Excel 2010, Project 2010, Project Server 2010

Project roadmap image

The Project Map can help you accomplish your project goals by teaching you how to work with the standards and practices of project management methodology as you use Project 2010.

The Project Map follows the phases of the project life cycle:

  • Initiate your project.
  • Plan your project with tasks, budgets and resources.
  • Track and monitor your project.
  • Close your project.

Click the links to go to “project management goals,” which provide you with detailed information on how to accomplish that goal.

Step 1: Initiate a project

The initiation phase of a project plan helps you prepare for creating a schedule in Microsoft Project. Activities that occur at this time include:

  • Preparing a charter that outlines the scope of your project at a high level.
  • Understanding who your stakeholders are.
  • Getting familiar with the communication and scheduling tools you’ll need to manage your project.

GOAL DESCRIPTION

Introduction to project management
Learn the basics of project management to get the most out of Microsoft Project and complete your project successfully.

Microsoft Project basics
New to Microsoft Project? Learn the basics of the program and how to get started using it for simple project management tasks.

Get to know Project 2010
Project 2010 has powerful new scheduling features, a timeline view, and the team planner, as well as the new ribbon interface.

Initiate a project
The best projects exhibit good planning before the schedule is created. Learn what happens before the schedule happens, such as stakeholder needs, project expectation setting, company constraints and portfolio, and charter drafting.

Step 2: Plan and build a schedule

After a project has been approved and initiated, it’s time to put it together using scheduling software. Activities that occur at this time include:

  • Adding tasks to a schedule.
  • Creating relationships between tasks using outlining and task linking.
  • Assigning people and other resources to tasks.

GOAL DESCRIPTION

Set up a project
Once you've finished your initial planning, use Project 2010 to create and set up your project plan.

Add tasks
Most projects begin with a list of the tasks that need to be completed. Once you create or import your task list, you can then define the relationships between them.

View your project
Project managers, stakeholders, and team members need different types of project information. Project 2010 provides many customizable ways to view the critical elements of your project.

Manage resources
Resources are typically people assigned to tasks in your project plan. They can also include anything that is used to complete a project, such as equipment and materials.

Manage risks
The best way to prevent risks to future projects is to learn from the risks that came up in past projects.

Step 3: Track and monitor your project

Once your project is underway, you need to know what’s happening in order to keep it on-track. Activities that occur at this time include:

  • Understand which views in Project help you discover problems in your schedule.
  • Take corrective action on problem tasks that are affecting the project end date.
  • Communicate problems and possible solutions to your team and stakeholders.

GOAL DESCRIPTION

Track progress
Though Project makes tracking easy, there are several steps to take before you can begin tracking your progress.

Manage project costs
Going over budget often causes projects to fail. Project 2010 can help you add and manage resources to make certain your project ends on time and in good shape.

Work with multiple projects
Use Project 2010 collaboration features to communicate across and manage multiple projects.

Communicate project information
Project 2010 can sync a task list to a list on a SharePoint site. Or you can import a SharePoint list into Project. This helps communication and collaboration in organizations that do not use.

Create and print reports
Project allows you to create visual and textual reports in Excel or Visio to help you analyze and present project information to stakeholders.

Manage risks
Identify potential trouble spots by anticipating risks and responding to risk events, and report project progress to stakeholders and team members.

Use Project Server to manage your project
Discover how Microsoft Project Server can be used to track and manage tasks and assignments throughout your organization.

View your project
Project managers, stakeholders, and team members need different types and depths of project information. Project 2010 provides many customizable ways to view the critical elements of your project.

Step 4: Close your project

All projects come to an end, but this doesn’t mean that your work is finished. If you don’t record the successes and challenges of the project, you’re doomed to repeat the problems in the next project. Activities that occur at this time include:

  • Reporting your project successes and challenges to team and stakeholders.
  • Archiving your project so that it can be used to help ensure the success of future projects.

GOAL DESCRIPTION

Close your project
Not all work on a project ends when the project ends. Archiving a project is also important, especially if you want others in your organization to copy the successes you had.

Capture and archive project information with SharePoint
Project 2010 can sync a project task list to a list on a SharePoint Server 2010 or SharePoint Foundation 2010 site. Or you can import a SharePoint list into. This is an important option for collaboration, especially if your organization does not use Project Server.

Create project reports
When a project has completed, then it’s time to put a stamp on it by creating reports to show everyone the success of the project. .

View your project
Project managers, stakeholders, and resources need different types and depths of project information. Project 2010 provides many customizable ways to view the critical elements of your project.

The Project Map: Your road map to project management - Project - Office.com

Thursday, 13 October 2011

What You Need to Know about Project Server 2010 Service Pack 1, Part 1:

The release of Service Pack 1 for Project Server 2010 and Microsoft SharePoint marks a major milestone in the product development lifecycle. All fixes prior to the June 2011 Cumulative Update (CU) are included in SP1. In addition, there are some key enhancements included in SP1 that users will appreciate, from new browser support to site storage metrics. In this article I cover seven of the most interesting and useful updates.

Read more: http://tinyurl.com/6ah4fob

In my next article, I'll lay out a basic plan for you to follow in implementing Service Pack 1.

SP1 WebNLearn! Sign up to join PJ Mistry for an MPUG WebNLearn session on Nov 29, 2011 that explores what you need to understand about the contents and implementation of Service Pack 1!

Thursday, 21 July 2011

EPM/SharePoint + Office Better Together!!

Key feature that often gets overlooked when selling benefits of EPM/SharePoint internally to end-users.

Thursday, 14 April 2011

Microsoft EPM - Managing Programs/Master Projects, Part10 – inserting/ embedding Sub-Projects into Master Projects

In this post, we will review how we bring everything together i.e. inserting/embedding Sub-Projects into Master Projects.

Once all the projects are published, return to the master project.

  • In the master project, click Insert > Project.
  • Next, select the projects to insert, one at a time. Ensure that each Project being selected is Checked-in and also the option 'Link to Project' is selected. See below for further details. Remember to insert the Projects in the order you want them to appear on the Program schedule.
image

Note: If you don't want to update the subproject with changes from the original project, or if you don't want to show changes from the subproject in the original project, clear the 'Link to Project' check box.

The Master Project/Program structure will start taking shape as you add/insert the Sub-projects. See example below.

If an inserted Sub-project needs to be moved/relocated to another part of the overall WBS, this can be done just as easily as you would move a task/summary task.

image

Critical Note: After the sub-projects are inserted, it is important to expand them so that their data is refreshed.

Configuring Cross-Project Dependencies

Once the sub-projects are inserted in the Master Project/Program, it is important to review and set up (as necessary) the dependencies on the various components that make up the overall Program.

Create dependency links between tasks and milestone across projects as necessary. See example below.

!

Important Note:

  • It is recommended that cross-project dependencies are not created at summary task level.
  • It is recommended that users add associated notes to cross-project linked tasks and milestones for ease of reference.

The procedure for creating dependencies on tasks and milestones across inserted sub-project projects is very much similar to that within the same project. For example, select the tasks/millstones to link and then click the 'Link Tasks' button on the toolbar. Refer to example below.

Linked tasked and milestones can be viewed easily by adding the 'External Tasks' column to your view and then setting auto filter to quickly filter in and out these links.

image

Once the dependencies are created, external dependent tasks and milestones will show up as 'ghost' tasks within the sub-projects. See example below:

image

!

Important Note:

It is recommended that for ease of reference, appropriate task notes are added when external project dependencies are created.

Saving & Publishing Master Project with Sub-Projects

Once all the sub-projects have been inserted and the required dependencies created, it is time to save the projects.

· Expand all sub-projects that have not been expanded since inserting into the Master Project/Program.

image

· Select File > Save

· Ensure that you select 'Yes to All' in the save dialogue to save changes on all inserted sub-projects and the Master Project/Program.

image

· Close the Master Project/Program including associated Sub-project.

Note: If there are some changes pending, the above save dialog box will appear.

image

· Ensure that the Master Project/Program and all the associated Sub-projects are properly checked in prior to exiting the application.

You can review the cache status via the File > Open Dialog box.

image

Setting Baselines (Optional if required)

Open individual sub-projects and baseline as required by your Business Processes.

· Open each sub-project via File > Open

image

· From the toolbar select Tools > Tracking and then select 'Set Baseline'.

Note: User may choose either to baseline the entire project or selected tasks.

image

image

· Save, Close and Check-in the Sub-project.

· Repeat the above steps for each Sub-project.

That’s all for now folks. In the next post, we will review process for updating sub-projects.

Wednesday, 6 April 2011

Microsoft EPM - Managing Programs/Master Projects, Part9 – Creating Sub-Projects

Hope you have been following the previous steps ok. Once the programme is published, it's time to create the projects i.e. ask the PMs to create their individual plans for their work-packages. Do so within Project Professional.

· Create a new project using an appropriate Enterprise Project Template.

image

image

· Update/set the Project Start date and Project attributes as appropriate.

· Create/Add new project tasks in the usual way, as appropriate for the project. There may be some additional activities that you may wish to add, i.e. in addition to those inherited from the Enterprise Project Template. Here is one of the example projects that will be part of the overall programme.:

image

· Build Project Team and assign Enterprise Resources to Project activities/tasks as necessary.

· Save the new Project using the 'agreed' naming convention for the Program and its constituents.

For example, use a common prefix for all components, say Project number or Project Keyword e.g. ‘Gemini Product_00_Program’, ‘Gemini Product_01_Screening’. This is so that all the components of the Program appear together when opening via Project Professional > FILE > OPEN and also with PWA > Project Centre view when sorting by file name. See example below showing Program and Sub-projects;

image

· Then publish the project. On first Publish, be sure to select to provision the Project workspace as a sub workspace of the Program workspace.

image

· Once the Project is published, close and check-in the Project.

· Repeat this for any other projects that are part of the overall Program.

In the next post, we will review how we bring everything together i.e. inserting/embedding Sub-Projects into Master Projects.

Friday, 1 April 2011

SharePoint - Social Tagging; what is it?

I often get asked this question?

This is a new feature of Sharepoint 2010, which takes Sharepoint to a whole new level. social tagging is also referred to as folksonomy.

Tagging of a content is basically assigning description words or categorising the content. There are two types of tagging social and expertise tagging. social tagging refers to content and adds metadata to content, i.e describes what th content is and what it is about. Expertise tagging is related to a person and describes the person. For example skills, projects they have worked on etc.

Social tagging helps users to grow the portals information architecture over time where as expertise tagging helps build relationships and connections to others in the organisation.

Hope this helps.Smile

Wednesday, 30 March 2011

Microsoft EPM - Managing Programs/Master Projects, Part8 – Creating the Program Structure

The following example illustrates the process for creating a Master Project/Program Structure following best practices;

· Login to the Enterprise using Project Professional.

· Create a 'new' Program structure/outline using an Enterprise Template.

Note: the Enterprise template will have all the required default options for scheduling tracking. The Enterprise Template will also have the appropriate Program activities and Milestones.

image

Fig - New Enterprise Templates

image

Fig - select Enterprise Template

image

Fig - New Program activities

· Set Project Start date and appropriate attributes for Program.

· Update Program work structure/activities as necessary.

· Build Team and assign Enterprise Resources to Program activities/tasks as necessary.

· Save Program using an appropriate naming convention.

For example, use a common prefix for all components, say Project number or Project Keyword e.g. P001 Sat Rem Program, P002 Sat upgrade Design. This is so that all the components of the Program appear together when opening via Project Professional > FILE > OPEN and also with PWA > Project Centre view when sorting by file name. See example below, showing Program and Sub-projects;

image

· Next, Publish the Program schedule to the server. This will prompt the creation of a SharePoint Services site/workspace.

Note: If you use WSS for EPM2007, then create the WSS site when you publish the programme. Publishing the Program and then the projects in the right order is paramount so that the project WSS sites can be created as WSS subsites. Note at this stage we've not yet set up any sub projects.

image

In the next post, we will review creation of individual sub-projects.

Microsoft EPM - Managing Programs/Master Projects, Part7– Recommended Process for Maintaining Programs/Master Projects

Here are the recommended process maintaining Master Projects/Programs within EPM;

· Open each sub-project, process task updates and update Project Attributes as necessary.

Note: It is recommended that updates are done and processed on individual sub-projects if using collaborative task updates. This would normally be done by the sub-project owner/Project Manager/Team Plan Manager.

!

When working with multiple projects, care should be taken to ensure that sub-projects are appropriately checked-in prior to inserting in Master Project.

· Save each sub-project after above updates and close.

· Open Master Project/Program ensuring that sub-projects are opened in Read/Write mode.

*

Note: User can check the detail view in Project Professional > File > Open dialog box and retrieve the list from the server. The sub-projects will be listed together if the appropriate naming convention is used.

· Expand each sub-project to retrieve the individual project data. The schedule of individual sub-projects will be affected depending on the progress on cross-project dependent activities/milestones.

· Update Master Project attributes as necessary and SAVE ALL changes including sub-projects.

· Publish Master Project/Program and Close.

· Open individual sub-projects, Save, Publish and Close.

The published Master Project/Program and sub-project data will now appear PWA > Project Centre/ Project Details and Data Analysis and custom reports.

Reviewing Team Activities

The Master Project/Program Managers can access the Master Project either via Project Professional or PWA > PC > Project Detail.

Team Managers (for example ,S&A) can review a consolidated schedule of all their team plans via PWA > PC. The team plans will be grouped together via Project Attribute 'Team Plan'. The user can see the individual project details as necessary via Project Detail views in PWA. Alternatively, a consolidated 'virtual' plan can be launched in Project Professional by selecting the grouping header in PWA > PC and selecting Edit. This will launch Project Professional (depending on user access rights) and open the selected/grouped schedules together for analysis.

If you need guidance on access rights on projects, review this post for ‘Multiple user access to common project’.

Thursday, 17 March 2011

Microsoft EPM - Managing Programs/Master Projects, Part6 – Creating & Setting Up

The recommended process for creating a Master Project/Program is as follows;

· Determine the various components that will make up the Master Project/program.

· Using Project Professional create an overall project schedule. This can be created from a 'blank' custom Enterprise Template with say one task, or it can be based on common activities that other sub-projects will depend on. Some users create a list of summary milestones (say by phase), which are later linked to key milestones in various sub-projects representing overall project phases.

Note: Assign Enterprise Resources to Master Project Tasks as appropriate.

· Set the project start date and appropriate attributes e.g. Project_Type = Program and Team Plan = PMO.

· Save the Master Project/Program with appropriate title (see guidance note in earlier section).

· Publish Master Project/Program to the Enterprise and close.

· Create other sub-project Project schedules using appropriate Enterprise Project Templates and adjust as necessary. Set Project start dates and project attributes.

It is recommended that tasks and milestones are setup with the option to start AS SOON AS POSSIBLE. This will make rescheduling and sub-project updates easier. Use of date constraints should be limited.

· Save sub-projects to the Enterprise using the appropriate naming convention and close.

· Open Master Project schedule and insert the sub-projects (with Read/Write option) as desired in the correct order and outline level.

!

Critical Note: A common sub-project should not be inserted in more than one separately published Master Projects/Programs within EPM2007. Refer to note below regarding nesting.

!

Note: Although nested/hierarchical Published Master Project/Program is supported within EPM2007, it is suggested that you try and limit to one hierarchy. When nested Master Projects are used, the user will receive a warning message regarding the existence of the common sub-project in another published Master Project. This is only a warning message and can be ignored.

· Set up cross-project dependencies within the Master Project/Program as necessary

· SAVE ALL sub-projects and Master Project/Program and close.

· Open individual sub-projects and assign Enterprise Resources as necessary (checking resource availability etc.) and set Baseline.

· Save changes to sub-projects.

· Publish sub-project to the server selecting the option to create workspace under the workspace for the Master Project/Program and close.

· Open Master Project/Program, Publish (choose to Save all changes if there are changes) and close.

image

(click picture to enlarge)

The published Master Project/Program and sub-project data will now appear PWA > Project Centre/ Project Details and Data Analysis and custom reports.

In the next post we will review recommended process maintaining Master Projects/Programs.

Friday, 4 March 2011

Microsoft EPM - Managing Programs/Master Projects, Part5 - Best Practises, Configuration/Design

The following configuration/design considerations need to be taken into account prior to using Master Projects within Microsoft EPM;

Terminology

The working instructions should clearly identify when to create Master Projects and define what would constitute sub-projects.

Project Naming convention

It is highly recommended that the naming convention for Master Project/Program and sub-projects be agreed in advance so that users can easily identify individual components of the Master Project/Program. In addition, the naming convention should easily help collate the various components when opening within Project Professional and viewing within PWA > PC.

For example, use a common prefix for all components, say Project number or Keyword, e.g. P001 Sat Rem Program, P002 Sat upgrade Design Project etc.

Resource assignments

Procedures should be set up so that assignment of the resources to activities is only done on sub-projects.

Process for managing cross-project dependencies (Tasks and Milestones)

Procedures should be set up such that only Milestones (and Tasks) are linked across projects. It is recommended that these Milestones are appropriately labelled and also notes against the Milestones appropriately define the external dependencies.

Linking of summary tasks across projects is not recommended.

Project Attributes

Appropriate project level Enterprise custom fields should be set up with either Long term program names or values to indicate type of entity. The following attributes are recommended;

- Project_Type (Program, subproject)

- Team Plan (EPS PMO, AS etc).

Baselining

Procedure should be set up such that only the sub-projects are baselined only after appropriate cross-sub-project dependencies are setup by the PMO.

Process for Managing Master Projects/Programs and sub-projects.

The following Post (part 6) with provide further details.

Maintaining WBS and Project Reporting

Procedures are setup such that sub-projects are inserted at the correct outline levels only within the Master Project/Program, otherwise this may affect any existing custom reporting.

Note: Treat sub-projects as if they were Summary Tasks on your standard project. Whatever outline level the summary task would be, insert the sub-project at the same outline level, say for example 'Plan' Phase was originally part of very large project that was split up as a smaller sub-project. In this case, it is recommended that you insert this sub- project in the master schedule/plan at the same outline level as the original schedule.

Updating Views and Reports

The PWA > PC views should be reviewed and updated such that there are Master Projects/Programs and sub- projects mixed in the same views. Certain project attributes such as Cost, Work and Duration are rolled up in PWA view. Consider a scenario where you have Program with projects P1 (cost £100) and P2 (£200). If there is view that shows all three of them together, then you will see £300+£100+£200 = £600.

clip_image002

There is an option to show or hide the inserted projects from within the project centre view.

clip_image004

Other recommended new views are;

- External Milestone Dependency views in Project Professional and PWA > PC > Project Detail

- Team Plans view in PWA > PC. This will group sub-projects by Project Attribute 'Team Plan'. See above.

Security/Access Rights

The access rights for Team Managers (for example, S&A) would need to be set up such that they can only view consolidated schedules of their Team Plans.

Enterprise Project Templates

It is recommended that custom Enterprise Project Templates are created for the overall Master Project/Program.

Additional Enterprise Templates should be created for Phases or Team Activities, i.e. representing constituents of a typical Master Project/Program.

Hope this helps!!

In part6, we will review best practise for Creating and Maintaining Master Projects/Programs.

Wednesday, 2 March 2011

Microsoft EPM - Managing Programs/Master Projects, Part4 - Soft Dependency - Deliverables

Most Project Managers want to be in control of their own destiny and do not want their plan/schedule to automatically move as result of a fixed external dependency, as this may have a knock-on effect on agreed milestones, billing, resourcing, costs etc. They may instead prefer to deal with this external change manually, after appropriate deliberations with the project delivery team. The key requirement here is collaboration between the PMs! They want to be armed with appropriate external change information i.e. notification of change so they can manage their project schedules effectively; either working from or to an external dependent project milestone/deliverable.

In contrast to fixed dependencies, 'soft' dependencies can be created across multiple projects. This is done in Microsoft EPM by using the Deliverable feature. Deliverables is a new feature in Project Server 2007/2010, which uses extended capabilities of SharePoint. It allows you to create list items that might be common to multiple projects, and then use those items as logical connectors among other project schedules. These connectors are called Dependencies.

This new feature allows owners of one project to expose key deliverables to their associated workspace, which is then consumed by other Project(s). The dependencies set up on these exposed deliverables are 'soft' and only show as indicators in the other projects, i.e. slippages on the deliverables from one project will not automatically move dependencies created on these deliverable in other project(s). This gives Project Managers/Owners of the other Projects more control over their Project schedules. They can adjust their schedules to meet the deliverable dependency dates as necessary.

See concept illustrated below:

image

(click picture to enlarge)

The executives can also view the Project Workspace showing the deliverables and subscribe to alerts and notification of changes. Different views in the project workspace can be created to show the deliverables as Gantt chart view or simple tabular view etc. Also, Key Performance Indicators (KPIs) can be created to easily identify the slippages on dependent deliverables.

It is recommended that an appropriate task naming convention (say including keywords of the originating project) is used to easily identify the deliverables in other project schedules. later in the series, further information will be provided on the use of Deliverables functionality.

In part 5, we will look at best practices, based on real-world field experience, for Managing Programs/Master Projects within EPM. Then, comes the interesting part…..getting practical with exercises.

Tuesday, 1 March 2011

Microsoft EPM - Managing Programs/Master Projects, Part3 - External Project Dependency Management

In Part 3 and 4, we will review the options for managing external project dependencies; Fixed and Soft Dependencies.

Fixed Cross-project Dependencies

Fixed dependencies can be created across projects using the following approach;

· Master Project/Program

· Consolidation of Projects

The key difference between the two is that Master Projects/Programs will be saved and published to the server, whereas consolidation of Projects is a means of viewing multiple projects (say for department, teams) 'on-the-fly' for the purpose of reporting/analysis or creating cross-project dependencies.

Consolidation of Projects

Users can create dependencies across independent and separate departmental projects that may belong to multiple Programs/Master Projects. This is done by creating a consolidated view of projects in a 'blank container’. The concept is illustrated in the figure below.

image

It is recommended that appropriate Project Centre views are created as necessary by reporting entity i.e. departments/divisions/core teams.

The steps for viewing consolidated project schedules and creating dependencies are as follows;

· Select multiple projects in PWA Project Centre view, as required, either by using the CTRL key or selecting the Project Centre view group header

· Click ‘EDIT’ on the view toolbar to open the selected projects in Project Professional 2007.

· View multiple project performance within Project Professional

· Create cross-project dependencies, if required. Note: The procedure for creation of dependencies on Tasks/Milestones across projects is very similar to that on the single project.

· Close and Checkin projects. Choose NOT to save the ‘container’ project. You may wish to save changes on other projects if you have made changes i.e. created dependencies across projects.

Refer to example in the figure below. Once the selected group projects are opened in Project Professional, they can then be re-arranged by simply moving them in the same way you would move a summary task.

image

You may have other reasons to consolidate project files. For example, you may want to combine them temporarily for a quick review or for printing.

Master Projects/Programs

Master Projects are primarily created for the purpose managing very large Projects or Programs. Large Projects and Programs are broken down into individual 'smaller' entities/projects.

For large projects, these are sometimes referred to as work packages managed by Team Managers. For Programs, these individual entities are Projects managed by other Project Owners/Managers. See example below:

image

Master Projects/Programs can be saved and published to the server. A common sub-project can exist in only one separately published Master Project/Program.

Note: Nested Master Project structure is supported in EPM2007. An example of a nested Master Project is as follows: 'Trials – UK Project' > 'Trials – EU Master Project' > 'Trials – General Master Project'

We will later review best practices and Management of Master Projects/Programs.

In the following post, we will look at ‘Soft Dependency Management’ i.e. ‘Deliverables’.

Wednesday, 23 February 2011

Microsoft EPM - Managing Programs/Master Projects, Part2 - Key Considerations

The use of Master Projects should be considered when;

- Consolidated schedule status (including Critical Path) reporting is required across multiple 'modular' projects (team plans)

- Simultaneous access to sets of activities by multiple users is required

- Managing very large projects with thousands of tasks/activities

- There is a requirement for managing Project Artifacts (project documents, Risks and Issues) from a common location

- There is a need to collaborate on dependencies across projects or large distinct phases/sets of activities

- There is a need to manage resource overallocation and prioritisation of projects

In the next post, we will review the options for ‘External Project Dependency Management’ within Microsoft EPM.

Tuesday, 22 February 2011

Microsoft EPM - Managing Programs/Master Projects, Part1 - Background

The term Master Project within EPM is a carryover from the earlier versions of Project. This is sometimes referred to as a program, portfolio of related projects, or simply a collection of projects say for reporting purposes.

There are times where a user may need to look at several projects at once to gauge the impact of a change to all of the related projects in one instance. Alternatively, the user may wish to use the consolidated project function to create a combined view across multiple projects to re- allocate resources so that any overallocations are addressed.

The concept of Master Project for a single user using Project Standard, i.e. with outside the Enterprise, is simpler as compared to when using this feature within the enterprise. An enterprise system is a collaborative environment where there are multiple Project Managers/Owners involved. When using the Master Project concept within EPM2007, certain best practices need to be adhered to. These will be detailed in the following posts. So, stay tuned.

Can Projects be considered ‘Archived’ by simply adding them to a special ‘deny’ Security Category in EPM?

I was asked earlier by an EPM administrator if this was an option to consider. My answer to him was, ‘it depends…..

This maybe an option in very small deployments with limited requirements. If you are planning to use this approach, you need to carefully consider the following;
    This process is not Archiving, but merely hiding projects i.e. making it not visible to users. These projects will still exist in the live databases.
    Build up of Projects, over-time, in the system may start effecting system performance. Conversely, it may be a small deployment but holding few very large projects with extended durations and assignments. If these completed projects are not archived and removed from your live databases, they will start hampering your system performance.
    Your Disaster Recovery will be dependent on the size of your live databases.
    With this approach, the completed projects are hidden, hence there is no instant access to associated project Workspaces i.e. no continued access to important project documents from within PWA environment unless you manually make a note of the URLs.
    Reporting capability will be hampered by the clutter/build-up of completed projects in the live databases over time.
    Admin over-head of manually adding projects to ‘deny’ security category. Or, additional expense of custom code/tool which automates this addition, but still providing limited capability mentioned above.

Hope this clarification helps.

Wednesday, 28 April 2010

Project 2007 – Visual Reports, create stunning Project Reports!

Applies to: Project 2007

Struggling to analyse project data? Want to easily extract Microsoft Project data to Excel? Want to create stunning Project Reports?

You can launch Visual Reports via the Reports menu button on the toolbar within Microsoft Project 2007 (standard and professional).

Note: Also refer to my earlier post ‘P2007 – Analysis Toolbar, where is ‘Analyze Timescaled data in Excel’?’.

 EPM2007_VisualReport_0

(click picture to enlarge)

 EPM2007_VisualReport_1

All of the templates you see listed in the dialog are example templates that are shipped to help get you started. If you create a new template and save it in your templates folder it will also show up here. You can even choose to include templates from another location such as a public share. Ideal for setting reporting standards. When you create or edit a template you can specify which project fields and custom fields to include in the template.

The following table shows the list of Visual Reports, grouped by category;

Name

Type Description

Task Usage


Cash Flow Report

Excel

This report shows a bar graph with cost and cumulative cost amounts illustrated over time.

P2007_VisualReports_CashFlowReport

Resource Usage


Cash Flow Report

Visio

This report shows planned and actual costs for your project over time. Costs are broken down by resource type (work, material, and cost). An indicator shows if planned costs exceed baseline costs.

P2007_VisualReports_CashFlowReport_Visio

Resource Availability Report

Visio

This report shows the work and remaining availability for your project's resources, broken down by resource type (work, material, and cost). A red flag is displayed next to each resource that is over allocated.

P2007_VisualReports_ResourceAvailabilityReport_Visio

Resource Cost Summary Report

Excel

This report shows a pie chart that illustrates the division of resource cost between the three resource types: cost, material, and work.

P2007_VisualReports_ResourceCostSummaryReport

EPM2007_VisualReport_4

Refer to example report in my earlier post ‘What Are My Project Costs by Resource Type for Next Period? Part 2’.

Resource Work Availability Report

Excel

This report shows a bar graph with total capacity, work, and remaining availability for work resources illustrated over time.

P2007_VisualReports_ResourceWorkAvailabilityReport

Resource Work Summary Report

Excel

This report shows a bar graph with total resource capacity, work, remaining availability, and actual work illustrated in work units.

P2007_VisualReports_ResourceWorkSummaryReport

Assignment Usage


Baseline Cost Report

Excel

This report shows a bar graph with baseline cost, planned cost, and actual cost for your project illustrated across tasks.

P2007_VisualReports_BaselineCostReport

Baseline Report

Visio

This report shows a diagram of your project broken down by quarter, then by task. This report compares planned work and cost to baseline work and cost. Indicators are used to show when planned work exceeds baseline work, and when planned cost exceeds baseline cost.
P2007_VisualReports_BaselineReport_Visio 

Baseline Work Report

Excel

This report shows a bar graph with baseline work, planned work, and actual work for your project illustrated across tasks.
P2007_VisualReports_BaselineWorkReport 

Budget Cost Report

Excel

This report shows a bar graph with budget cost, baseline cost, planned cost, and actual cost illustrated over time.

P2007_VisualReports_BudgetCostReport

Budget Work Report

Excel

This report shows a bar graph with budget work, baseline work, planned work, and actual work illustrated over time.

P2007_VisualReports_BudgetWorkReport

Earned Value Over Time Report

Excel

This report shows a chart that plots AC (actual cost of work performed), planned value (budgeted cost of work scheduled), and earned value (budgeted cost of work performed) over time.

 P2007_VisualReports_EarnedValueOverTimeReport

Note: My example above include only Earned Value and Planned Value.

Task Summary


Critical Tasks Status Report

Visio

This report shows a diagram showing the work and remaining work for both critical and non-critical tasks. The data bar indicates the percent of work complete.

P2007_VisualReports_CriticalTaskStatus_Visio  

Assignment Summary


Task Status Report

Visio

This report shows a diagram of the work and percent of work complete for tasks in your project, with symbols indicating when baseline work exceeds work, when baseline work equals work, and when work exceeds baseline work. The data bar indicates the percent of work complete.

P2007_VisualReports_TaskStatusReport_Visio

Resource Status Report

Visio

This report shows a diagram of the work and cost values for each of your project's resources. The percent of work complete is indicated by the shading in each of the boxes on the diagram. The shading gets darker as the resource nears completion of the assigned work.

P2007_VisualReports_ResourceStatusReport_Visio

Resource Summary


Resource Remaining Work Report

Excel

This report shows a bar graph with remaining work and actual work for each work resource, illustrated in work units.

P2007_VisualReports_ResourceRemainingWorkReport

Enjoy reporting! You can contact me (pj@projectsolution.co.uk) if you have any queries or want a demonstration of the reporting capabilities of Microsoft Project 2007.